User:InnaGrateDaze/Reina-Unsoku-tech: Difference between revisions
m (trimming) |
m (i5-13) |
||
| Line 17: | Line 17: | ||
Unlike the Wind Step punch parry, the Unsoku Kou punch parries can't be immediately cancelled with a panic back-dash or side-step input. | Unlike the Wind Step punch parry, the Unsoku Kou punch parries can't be immediately cancelled with a panic back-dash or side-step input. | ||
The punch parry window is about i2-i8 (gonna check)frames and it takes 22frames from the beginning of Unsoku Kou to block. | The punch parry window is about <s>i2-i8</s> i5~13 (gonna check)frames and it takes 22frames from the beginning of Unsoku Kou to block. | ||
You are unsafe from Lows from i1-i21. You are unsafe from Lows, Mids and Highs from i1, i9-i21 or 13 frames. | You are unsafe from Lows from i1-i21. You are unsafe from Lows, Mids and Highs from i1, i9-i21 or 13 frames. | ||
Revision as of 09:18, 13 May 2024
Unsoku (Gen) Tech
Unsoku Cancel
All three variations of Reina's Unsoku stance can transition into Wind God Step/ crouch dash by inputting DF during the stance animation.
For Unsoku (Kou), WGS sparks/crouching comes out i21 (Blocking i22). (Press 2/3 on i21 for i31(P)EWGF (i21 = i1, i31 = i11)
For Unsoku (Gen), WGS sparks/crouching comes out i22 (Blocking i23). (Press 2/3 on i22 for i32(P)EWGF (i22 = i1, i32 = i11)
For both, you can hold back and eliminate the sparks as well as sound effect if doing the fastest cancel.
While cancelled Unsoku Kous travel less distance when chained together, their most effective use is in creating a pseudo-option select for punch parry situations.
Unlike the Wind Step punch parry, the Unsoku Kou punch parries can't be immediately cancelled with a panic back-dash or side-step input.
The punch parry window is about i2-i8 i5~13 (gonna check)frames and it takes 22frames from the beginning of Unsoku Kou to block.
You are unsafe from Lows from i1-i21. You are unsafe from Lows, Mids and Highs from i1, i9-i21 or 13 frames.
Unsoku Transitions
From Unsoku, Reina has nearly direct access to all her moves and stances except Heaven's Wrath stance. Reina's crouch dash can be cancelled into Side Step into the background, jump, (ub,b), standing, crouch, (Full crouch- I need to check a Bryan guide I saw), and her normal WGS/crouch dash options. When doing a quick df input, the game will buffer immediate side step towards the foreground.
Unsoku Movement
Having come from SSBM, Reina's UNS (gen) movement is the closest thing to Melee's dash-dancing/pivot stops - down to being generally unsafe from the beginning til the end of the movement.
Unlike most fighting games, blocking or being in Shield is one of the worst states you can be in Melee. The best state in the game is CROUCHINGSTATUS due to the reduced hitstun received by all attacks and the ability for characters like Fox to get a 0-death combo from "taking an attack". And while footsies and neutral exists in SSBM, both of those are often avoidable due to the immense strength movement options offers players.
While it doesn't seem like it, SSBM is also a "3-Dimensional" game, in a sense. While characters cannot travel across the 3rd axis, our characters' attacks fully move in 3-Dimensional space. That means side, spacing, momentum (as hitboxes slur based on character velocity) and a multitude of other details can affect whether a move actually hits an opponent or not.
KBD
KBD was/is the strongest universal movement options. While it has many strengths and is safe due to proc-ing standing block throughout its duration, it is highly linear and a bigger input commitment when used by itself.
The frame inputs are rough for near perfect KBDs to give ~0.65+ range per dash at around ~i11-i15 (+/- 2frames) per KBD. In addition, KBD's are most effective in the first 1-3 Back Dashes -
- One back dash covers most close ranged moves and throws.
- Two back dashes/ 2 b,n,b,db,b,n, (or 2KBD's) covers the previous moves and mid ranged attacks.
- Three back dashes/ three KBD inputs or two KBD inputs + one back dash.
| Max.Frame | M.Input | min.Frame | m.Input |
|---|---|---|---|
| i1 | b | i1 | b |
| i2 | n | i2 | n |
| i3 | B | i3 | B |
| i4 | (hold B) | i4 | (hold B) |
| i5 | (hold B) | i5 | (hold B) |
| i6 | (hold B) | i6 | (hold B) |
| i7 | (hold B) | i7 | (hold B) |
| i8 | (hold B) | i8 | (hold B) |
| i9 | (hold B) | i9 | (hold B) |
| i10 | (hold B) | i10 | (hold B) |
| i11 | (hold B) | i11 | (hold B) |
| i12 | (hold B) | i12 | (hold B) |
| i13 | (hold B) | i13 | (hold B) |
| i14 | (hold B) | i14 | (hold B) |
| i15 | (hold B) | i15 | db |
| i16 | (hold B) | i16 | b |
| i17 | (hold B) | i17 | n |
| i18 | (hold B) | i18 | b (2nd bd) |
| i19 | (hold B) | - | - |
| i20 | db | - | - |
| i21 | b | - | - |
| i22 | n | - | - |
| i23 | b (2nd bd) | - | - |
- Ideally, KBD is only unsafe from mids and highs for one frame during db - however, the average player will hold db anywhere from 2-10 frames during this time.
- Each b,n, and db input can take an additional 2-5 frames wit
- Significant distance is only achieved if the back dash is uninterrupted for 11-15 frames. Waiting longer than 15 frames, in general, doesn't give more distance & going faster than 9 frames gives less distance than doing one normal back dash.
- Realistically, KBD look more like, (i1~4 - b); (i5~7 - n); (i8~22 - b*); (i23~26 - db); (i27~30 - b); (i31-i33 - n) total i33 (or i29 with a shorter back dash).
One UNS(gen).DF,B / Unsoku(gen) Back Dash (UBD) takes 22 frames. ~i10-i16 SS,BD generally dodges or catches the anticipated responses.
Head to head, perfect KBD's (~i18-i22<) are stronger than UBD's (i22). However, Most players will be doing KBD's/BD's slower than i18 or cover less distance per KBD.
In practice, these aspects of Korean Back Dashing demonstrate its biggest flaws- it's linear movement and input experience.
While UBD is no faster than i22, it gives 0.68 range minimum in addition to be rotated left-axis. (Single back dash gives about 0.65 range then sinks back around to 0.61)
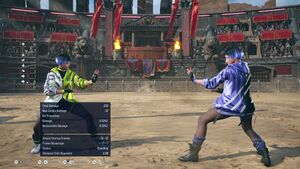
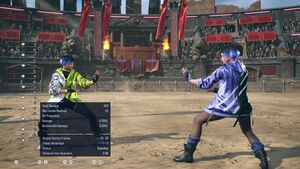
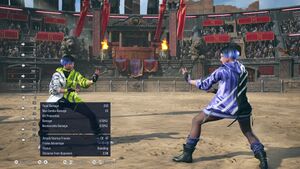
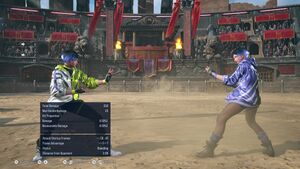
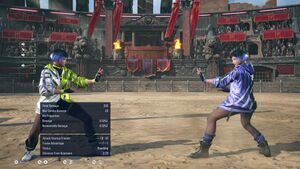
Perfect KBD's cover more linear distance in less time than UBD. But in a similar amount of frames, Reina can move backwards and off-axis in less time than someone doing a KBD -> SS -> bd/back.
With one UBD, Reina travels around half of a single Side Step. With two UBD, Reina's travels more off-axis than a single Side Step.
Combining Movement
Alone, Reina's UBD is useful in creating space and unintentionally side stepping linear approaches.
When used with KBD and Side Stepping, it can bait opponents into trying to punish your riskier UBD or force opponents to wait for your response.
Side Step alone brings you closer about 0.04-0.07 (~0.05) range.
Unsoku Range
Combining both the WGS and Sentai stances, Reina can travel extremely far from her Unsoku stance.
Most opponents currently expect Reina's to play out the full Unsoku stance or immediately go into UNS.4.
Combined with the distance brought from chained UNS(gen) canels, Reina can threaten space beyond her normal f,F+2 range.
General Strategy
Up Front:
- UNS(gen) Back Dash = block @ i23 (range = 0.68)
- UNS(kou) Back Dash = block @ i22
- Back Dash = max range ~i11-15 (range = 0.65)
- Perfect KBD ~= i18-i22 (~0.72)
- f+2,u/d = i13 (h-8dmg) (-9/-3/-3) [+0(you&opp.active i13+~i20-i21/)/+6/+6] (your actual active frames depend on what you do. e.g, blocking/crouch blocking makes you -7, but SS is ~-3 to 0)
Reina's UNS Options
- UNS Gen/Kou
- UNS.4 (UNS.4,D)
- 1+2/SSH (SSH.3;SSH.uf+3;SSH.uf+4)
- f+3/SEN (SEN.#; SEN.#+#)
- df/WGS (WGS.#; WGS.#,#; WGS.4,2,d; ws#; ws#,#)
- df,b/db/d(sidestep foreground)/D(crouch)/f(f,F or f,f,F from d,DF,f,n,f)/UF(forward hop)/u(sidestep background)/U(jump)/ub(back hop)/Reina's Fading Shadow or Swift Shadow/ n(ws#; ws#,#) /db,df,d(?)(instant Full Crouch)
- ^ Standing, While Standing, While Running, While Crouched, While Full Crouched, and During Side Step moves from df, -> <option>
- Wind Step is technically an option as well from df,b etc.
- Heaven's Wrath and Wind Step cannot be directly accessed from Unsoku.
f+2 and Unsoku
f+2 is the only move besides Reina's Unsoku stances themselves that can transition into Unsoku. However, you can only go into UNS(kou) from f+2,u/d and not UNS(gen).
f+2,3 (m-16dmg) i18~19 (-9/+2/+2) f+2,3,f (-2/+9/+9)
While f+2,3,f is -2 on block, the Sentai transition on hit, (+9) is confirmable if you see the first two hits combo.
At -9 on block, f+2 is technically weaker than f+2,u/d (+0). Using f+2,u/d and delayed f+2,3 can help you get a read on what your opponents do after f+2. Because f+2,3 jails, you won't see whether your opponent is mashing unless you delay the timing enough or forego the 3.
The benefit of utilizing f+2 is that it gives you a less predictable mix-up scenario compared to 1,1,2.Hit -> +11SEN and f,F+2.block -> +2SEN . In addition, 1,1,2 -> SEN seems to be bugged as it prevents Reina from blocking after an empty Sentai. So even though 1,1,2 -> is +11, it is less safe than f+2,3,f.Hit -> +9. And f,F+2 is unsafe during empty Sentai.
f+2's biggest weakness are its inability to catch side steppers, being crouch launchable, and requiring close proximity.
It's also a major commitment into a mix-up situation, but it's relatively safe with f+2 and f+2,3 being -9 on block and f+2,u/d being +0 on block. The biggest risk is accidentally doing f+2,3,f -2SEN on block because every option is practically Jab punishable- but this can be avoided by only going into Sentai on hit confirm.
In f+2,u/d you're +0 for WGS options and UNS options, around -1 for Side Stepping, and -7 for blocking/crouch blocking.
Most of the time, you'll be using a mixture of f+2; f+2,u/d ->Block/Side Step; and f+2,3 to gather information about your opponent's tendencies.
- If they're mashing; delayed f+2,3.
- If they're crouching; instant f+2,3 or vary timing/distance on f+2 or alt option
- If they're holding block; you can run f+2,u/d -> UNS options
- If they're side stepping; wavedash f+2 or BD wait or alt option
While a lot of the options from f+2 are stoppable, they're both hard to punish and hard to punish with.
Unsoku Alone
Reina's UBD is her most versatile stance and movement tool next to her WGS.
Her Unsoku Kou stances have a punch parry from i2~i8 and all her Unsoku stances can transition into each other.
Reina will dodge almost everything in Round Start with 1-3 UBD except for extremely aggressive approaches. It's her strongest opener and can easily get heat with UNS.4 or whiff punishing with f,F+2 -> SEN.3.
Unlike most of the other characters, Reina doesn't need to approach even though she has strong approach tools with her wavedash and even Sentai stance. Her UBD and wavedash allows her to move backward and forwards respectively much more smoothly than other characters.
But by itself, Unsoku(gen) can whiff more moves due to its non-linear path.
Most of the time, you'll be doing UNS -> df -> buffered Side Step -> KBD input to get quick distance and axis rotation.One UNS.SS.KBD puts adds around 0.67 range and rotates more than a full side step.
UBD chains are used to create rapid space between you and your opponent, or to bait more committed approaches.
Unsoku Dancing, or looping Unsoku stances into each, from a distance also baits out approaches from your opponent. If done from a far enough distance, you have enough time to cancel into block or Unsoku(gen) to create an opportunity for a whiff punish.
UNS.4 is safe being -8 on block, but highly telegraphed based on current playstyles.
- If your opponent is back dashing or side stepping, UNS,f+3->SEN.4 or SEN.3/SEN.3+4/SEN.1+3
- If they're pre-empting to stop you, delayed UNS(kou) for punch parry or cancel into block (can also go into b+1+3 if you think they'll do a while running or a fast-ranged mid| and ws3+4 can skew people's distance calculation).
- If they plan to block, UNS,f+3 -> SEN.# options are open.
Combining Unsoku
Unsoku essentially augments the range of your other options. It also gives Reina movement tools that facilitate Reina's other options.
In SSBM, neutral starts were only a thing in the past 10 years or so of our competitive scene. Port priority and stage specifics made it that learning cheese openers and their counters were a necessary aspect of the game.
In Tekken 8, Reina can effectively avoid a majority of the round start interactions with 1-3 UBD.
As long as you're opponent is doing a safe approach, you can get an early whiff punish at round start.
In neutral and for the majority of the mid game, Unsoku is used primarily for its ability to create space, scare the opponent, and bait approaches. Unsoku(kou) is effective at 1-2 range and Unsoku(gen) is more effective beyond 2.5. All Unsoku stances carry some risk when done within range 1-3.
At the end game, Reina can force an opponent to approach by running away with UBD if she's at advantage. At disadvantage, it is important not to use Unsoku(gen) as often if you're opponent is simply running away. It's a lot riskier to use but can still be effective at baiting a whiff.
Ultimately, you want your opponents to respect your space when you're in Unsoku stance. You want them to start thinking about all your options (from Sentai, WGS, UNS.4, etc) whenever you go into stance.
With enough space, you can easily vary your timing by switching between different Unsoku stances, Sentai, WGS, Side Step, Senshin, Wind Step, Back Dash, etc.
--
The way I've been using Unsoku/UBD in Tekken is similar to Melee-wavedashing, dashdancing, and pivot stopping in Melee. While Melee can play at traditional footsies range, which can be micro-adjustments of space like other fighters, it often plays around with a much wider range of space in a shorter span of time. Tekken 8 facilitates a more open play style and allows Reina to play around and control a wider range of space than the other characters can in a way similar to Fox in Melee.
Dealing with Unsoku Counters
wip
Pre-emptive attacks can stuff Unsoku-based approaches. In the f+2,u/d scenario, you can do f+2,u,df,b,b to dodge Reina's generic throws (does not work SSL). In rare situations, you can dodge Homing movies like SEN.3+4. But for them to do raw SEN.3+4 from block is worse than simply doing b+2 ( as Reina in the ditto ).
Fundamentally, you can always block or crouch block your opponent's response. Some moves are Side Walkable that wouldn't be normally from f+2,u/d.
f+2 is duckable and side-steppable. If they get a read on your f+2 timing, vary your timing and use your mids like b+2; f,F+2, and df+1
f+2,u/d -> UNS.4 will High Crush and hit mid . Can be used to dodge throws and highs.
Although Standing options come out -6, Reina's b+1+2 Power Crush will be in armor by then and beat slower Power Crush moves, mids, and highs.
f+2,u/d, SSL/R,b,b will dodge most steppable moves and give you enough time to block or react to Homing Attacks. Reina has no real way to evade Mid Homing attacks and has to block or parry them. Transitioning into UNS(kou) or using b+1+3 can cover most offensive mid/high options. For lows, jump status and low crush moves will work as well as low parry. At worst, you can do the PEWG to beat/trade with any i13(or slower) attack or Jab/Crouch jab. You can also use Reina's Fading Shadow or Swift Shadow -> df,2 to dodge and punish lows.
If your opponent starts focusing solely on spamming mids, it's a good time to include the delayed f+2,3 into your mix-up.
Once your opponents starts to respect f+2,3 or your mid counters, they'll begin to side step your options. Side Step Left covers a lot of your options. SWL can evade an extremely delayed f+2,3 but the same delay makes it punishable with jab.
You're ~-6 if trying to do an attack from Standing as soon as possible. Jab will trade with an i16 move like Reina's b+2. Reina's Side Step coverage is weak in this situation. At best, doing a grab at -6 will cover both Side Steps. More often than not, you'll be choosing between f+2,u & f+2,d in response to your opponent's Side Step direction. If they side step wait, try and match. If they side step attack, try and go the opposite.
f+2,u/d Limits
In the beginning, you have to condition your opponent to respect your f+2 mix-up by stuffing their mashing. Afterwards, you need to make your opponent afraid to Side Step or fish for whiff punishes. Unlike the previous stages of this mix where we focused on countering basic responses (and enabling our full toolkit), this point of the mix-up is solely about stealing your turn back.
We want our opponents to guess wrong. Fastest f+2,3 jails, but we want to delay it more often than not. Our main mix-up becomes f+2,3 or f+2,u/d. You want to avoid getting your f+2 stepped or ducked. As long as you connected with f+2 on block or hit, you can enforce the mix. We want to prepare for parry set-ups if the opponent is attacking after Side Steps, or create space if they're waiting for a response. You're safe, but at disadvantage if your opponent doesn't attack first. You want to take these opportunities to peel away during f+2,u/d and entice the opponent to start attacking you again. This is only possible if the opponent respects your delayed f+2,3 enough to not mash into your f+2,u/d.
From here, we want to choose options that cause our opponents to respect the other choices more.
- If they don't respect our f+2 by ducking or stepping it, use mid checks to enable our mix-up.
- If they don't respect our f+2,u/d by mashing options, do delayed f+2,3 to catch the CH. (Sentai transition not recommended in case they don't mash)
- If they don't respect our delayed f+2,3 by doing PC's, we can do instant f+2,3 to see what they'll do or start using f+2,u/d again.
- If they wait out the whole f+2,3 string before mashing, see if what their mashing is slow enough to parry. Otherwise, start forcing them to respect f+2,u/d since they're giving you space between f+2,3.
- Once they start respecting delayed f+2,3 and primarily block, we can switch to f+2,u/d until they start side stepping.
- If they start stepping f+2,u/d; we can use delayed f+2,3 again.
- After they start attacking again, we'll go for parry set-ups to dissuade the opponent from mashing into f+2, u/d again.
- At this point, your opponent should be hesitant. If your opponent starts going defensive and stops trying to beat your options, you can back out of the f+2,u/d mix much more safely.
- Delayed attacks from your opponent will usually give you enough time to disengage or punish with PEWG.
- You want your opponents to attack in between f+2,3 and block during f+2,u/d.
- Use delayed f+2,3 to catch people mashing in between and people trying to side-step f+2,u/d.
- PC is a mashable counter to stop delayed f+2,3 - you can beat it with f+2,u/d,
- For f+2,u/d; we use our Parries, PC, HC, LC, and other turn stealing moves.
- Goal is to disengage from f+2,u/d uncontested and create more offensive opportunities for your other moves.