| Paul |
|---|
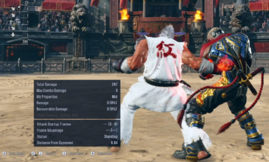
Buffered 2 > wr2
An instant while running move cannot be fully buffered, but its first f,n input can. With a 22-frame buffer window for instant while running attacks, f,n can be input extremely early during a 2 jab (as early as frame 10) and still result in a valid wr2 command if the remaining inputs are performed quickly enough after the 2 jab recovery ends.
Taking advantage of this large window makes the 2 > wr2 link easier by effectively splitting its input into halves, with only the second set of inputs (f,n,f,f+2) requiring any precision in their timing.
| Startup | |
| Active | |
| Recovery | |
| Standing | |
| Dashing/Running |
Note that these are only examples meant to show the upper and lower bounds of the buffer window. Frame-perfect inputs are rarely, if ever, required for a successful 2 > wr2 link.
Resplat
Splat > Reposition > Splat > qcf+3+4 > d+1+2 > Ender
- First splat must be a wall-hitting combo starter that causes opponent to enter a forward-falling slide state
- Reposition so that the next attack splats as high as possible — one backdash is the most common solution, but some splat angles require lateral, delayed or forward movement
- Second splat requires qcf+1 or u/ub/uf+3+4 to keep opponent high enough on wall for followups
1+2 Fast Cancel
1+2 (hold 16-34f) > f~u~b (release 1+2)
Useful for baiting big keepout attacks or locking down defensive players. Versatile in its utility and relatively safe if used intelligently.
- Can be used throughout a set to condition opponents. If they begin to challenge the 1+2 cancel, release a well-spaced level 2 charge for 42 CH damage (48 with Heat) and huge knockback.
- Cancel into an immediate grab or low to catch opponents looking to block a 1+2 release. df+1+3:qcf+2 is a solid option at the wall.
- Cancel into sidestep with 1+2~f~u or block to punish committal counter attempts.
- Cancel into another fast cancel 1+2 for maximum mindgames. Do it twice. Do it three times. The world is your oyster.
1+2 can be canceled between 16 and 34 frames of charge. Canceling does not consume Heat.
H.1+2* Wall Reset
H.1+2*, particularly at the wall, is a powerful and criminally underrated alternative to H.b+2,1* and H.d+1,2* setups. End your wall combo with any sway cancel (df1~b, ws1,2~b, 3,2~b) and instead of finishing with a low wall hit, begin charging 1+2. If timed correctly, you should be able to confirm and react to whether or not the opponent techs.
If the opponent techs, H.1+2 will be charged to level 2 by the time they return to a standing state. Time your H.1+2* release accordingly — it will catch techs to both sides due to its upgraded tracking — and convert a hit into 70-100 damage depending on the splat angle.
If the opponent does block H.1+2* at the wall, they will take 17 chip damage and a -17g wall crush. At this point, Paul's pressure options become nearly uninterruptible. Continued blocking will lead to significantly more chip damage (provided Paul has Heat remaining) while hits can lead to splat combos.
The obvious counterplay to this technique is remaining grounded and punishing H.1+2* on whiff. However, because this setup leverages the large frame advantage of a sway canceled wall hit, this counterplay is seeable and can be compensated for. If the opponent remains grounded, punish with fast cancel into db+2 for free OTG damage and more oki. This comes with the added bonus of saving Heat, as a cancelled 1+2 costs no meter.
Other wakeup options, such as recovery kick, may also work against this setup. But if the opponent adjusts and begins to call out the H.1+2* reset, they leave themselves vulnerable to fast cancel feints and other oki tricks.
Pauldash
d,df~d,df~u > repeat
Quickly cancel crouch dash into Deep Dive with df, crouch cancel Deep Dive with u, and repeat for Paul's pseudo-wavedash/snake dash. Much easier to execute reliably with some form of SOCD cleaning.
Pair with sidesteps for oki approaches (DPD will realign and chase down techs to either side) and quick ws1,2/DPD.4 mid-range pressure (high evasion from CD/DPD can create whiffs against some keepout buttons).
When using in neutral, be aware of Deep Dive's startup delay and input lockout, which can give opponents enough time to recognize and challenge your approach.
BT Tech Trap
- [86] H.qcf+2 WBl! > SSL~F > SSL > qcf+1 (x3) > SWA.1+2 T! > dash > UF
- [+99] ws1,2~b > SWA.1+2 > 3,2~b > SWA.1+2 T! > H.qcf+2~f > qcf+2
Forward jumping against a backturned opponent in Tornado state can force tech attempts to recover backturned.
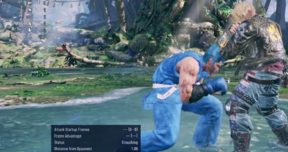
Deep Dive Startup Delay/Input Lockout
There is a 10-frame window after Deep Dive where Paul's movement is locked and attack options (both ws and DPD) start up 1-10 frames slower.
An immediate press after DPD (ws1/ws2/ws3/ws4/DPD.2/DPD.4/DPD.3+4) will add 10 frames of startup to that move. This delay decays gradually for each frame following the DPD input, until startup eventually returns to normal. For example:
- ws1 startup is i15~16
- d, df, d, df, ws1 startup is i25~26
- d, df, d, df, (4f delay), ws1 startup is i21~22
- d, df, d, df, (5f delay), ws1 startup is i20-21
And so on until 9f delay (10f after DPD), when ws1 startup is back to the regular i15~16.
The Frame Data display in Practice/Replay mode does not account for these additional frames and shows only the attack's normal startup.
This decaying startup delay is similar to that of sidestep moves, but with the additional constraint that Paul's only bufferable movement in this state is u (which cannot be used to immediately crouch cancel - see next section for details).
Lockout frames begin as soon as the initial crouch dash is canceled into Deep Dive. Delay between CD/QCF and DPD inputs does not seem to matter.
This delay makes Deep Dive a more committal approach than Paul's regular crouch dash and has practical drawbacks in both neutral and pressure. Be mindful of this extra startup before attacking with a long-range iWS1,2 or DPD.2, and avoid using DPD inputs for iWS at closer ranges whenever possible.
-

iWS1 (normally i15~16) hits on frame 25 when input immediately after Deep Dive.
-
DPD.2 (normally i15) hits on frame 25 when input immediately after Deep Dive.
-
Paul cannot block in the 9-frame lockout window following a Deep Dive input.


Crouch Cancel Does Not Avoid Lockout
Crouch canceling to avoid the DPD delay window and immediately return to neutral does not seem possible. The sidestep from an up input can only be buffered and executed 10 frames after DPD at the earliest. No other directional movement or attack can be buffered, and some inputs may lead to unintentional jumps (this appears to be a bug).
This includes b and d, meaning you cannot block for at least 10 frames after DPD.
-
Mids cannot be blocked during the lockout window.
-
Highs will still be evaded.

