| Line 29: | Line 29: | ||
Delayable, sway cancelable mid-mid pressure tool. First hit tracks far to Paul's left side and combos into second on CH. The second hit, which should always be sway canceled, is +1 on block, +14g on hit, and CH leads to two confirmable Heat Engager options with SWA.2 or f+2. Great range when used as iWS from either crouch dash or DPD. Highly abusable string, and one of Paul's best attacks. | Delayable, sway cancelable mid-mid pressure tool. First hit tracks far to Paul's left side and combos into second on CH. The second hit, which should always be sway canceled, is +1 on block, +14g on hit, and CH leads to two confirmable Heat Engager options with SWA.2 or f+2. Great range when used as iWS from either crouch dash or DPD. Highly abusable string, and one of Paul's best attacks. | ||
;'''Crouch Dash, Deep Dive''' | ;'''Crouch Dash, Deep Dive''' | ||
Close in on opponents by utilizing Paul's crouch dash and its extension. Good pokes from Comorant Step (QCF) are ws1,2~b (mid-mid) and qcf3 (low). Good pokes from Deep Dive extension ( | Close in on opponents by utilizing Paul's crouch dash and its extension. Good pokes from Comorant Step (QCF) are ws1,2~b (mid-mid) and qcf3 (low). Good pokes from Deep Dive extension (d,df,d,df) are ws1,2~b (mid-mid), DPD.4 (low) and DPD.2 (mid with delayable high/mid/nothing followup). | ||
;'''ss+3''' | ;'''ss+3''' | ||
Low with great reach, only -12 on block. Guaranteed d1+2 on counterhit. | Low with great reach, only -12 on block. Guaranteed d1+2 on counterhit. | ||
Revision as of 06:54, 4 May 2024
| Paul |
|---|
| Strategy (Tekken 8) |
|---|
This page is for Tekken 8. For Tekken 7, see Paul strategy (Tekken 7).
Combo Theory:
Launchers
- df+2
Fantastic safe on block high-evading mid. Time your use of this so that you have your opponent under pressure where they would need to reset momentum. Once you have the read on the jab counter with df+2. Be careful as misreading this as this would be countered via armored moves or, if you are neutral or at a disadvantage, quick counter hits.
- b+3
Another amazing safe on block launcher. Comes out faster than df+2 for clutch situations, but with a high hitbox. Creates a low launch on hit. This is a great launcher to pressure with, as it has forward momentum and moves Paul about 0.8 distance during the animation toward the opponent.
- ff+4
Cartwheel launcher. This will give you variable frames on block based on your distance to the opponent when the hitboxes make contact (like wake-up spring kicks). Can be anything from -1 if very close to +5 if you make contact at the tip range. Slow (i27~i34) startup makes it vulnerable to float attacks and sidesteps.
- uf+3, uf+4, uf3+4
Low-crushing mid hopkicks. uf+3 is launch punishable on block but has an extension (uf3+4) to catch opponents mashing after the first hit. Neither uf+4 or uf3+4 are launch punishable but the latter can be punished mid-string.
Enders
- 2 > fff+2 - Damage/floor break
- d+4,2:1+2 - Wall travel/wall break
- ff2:1 - Wall splat
- qcf+1 - Okizeme
- qcf3+4 - Okizeme
Poke Theory
- Plus frames
uf+2, f1+2, ss1, df1~b.
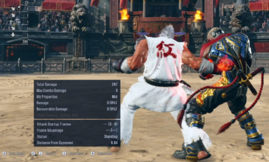
- ws1,2~b
Delayable, sway cancelable mid-mid pressure tool. First hit tracks far to Paul's left side and combos into second on CH. The second hit, which should always be sway canceled, is +1 on block, +14g on hit, and CH leads to two confirmable Heat Engager options with SWA.2 or f+2. Great range when used as iWS from either crouch dash or DPD. Highly abusable string, and one of Paul's best attacks.
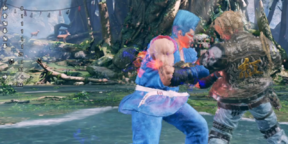
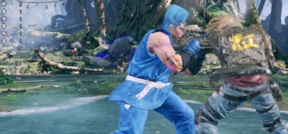
- Crouch Dash, Deep Dive
Close in on opponents by utilizing Paul's crouch dash and its extension. Good pokes from Comorant Step (QCF) are ws1,2~b (mid-mid) and qcf3 (low). Good pokes from Deep Dive extension (d,df,d,df) are ws1,2~b (mid-mid), DPD.4 (low) and DPD.2 (mid with delayable high/mid/nothing followup).
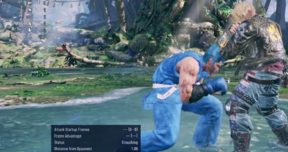
- ss+3
Low with great reach, only -12 on block. Guaranteed d1+2 on counterhit.
- df+2
df1~b and ws1,2~b make it easy to condition opponents into jab checking your pressure. Read this timing and counter with df+2 toevade high and launch the opponent for big damage.
- 3,2~b
Easily ducked and launched on reaction. Should not be used outside of combos. On its own, however, 3 is a solid keep-out button.
Pokes
- i14 DF1,b - 11 DMG - #PLUSOB #SWAY - Best way to pressure with sway
- i15 3,2,b - 31 DMG - #stringGapPunishable #PLUSOB #SWAY - longer range than DF1,b to engage into sway pressure
- i15 QCB2 - 27 DMG - #safeOB #heatEngager - Natural follow-up for any of the sway pokes
- i15~17 F,F+2 - 14 DMG - can cancel
- i18 QCF 3 - 18 DMG - #chLauncher #unsafe
- i19 SS.3 - 17 DMG - Good range pressure tool, natural follow-up on counter hit; d+1+2 for 50 DMG.
At wall:
- i12 - FF1+2 - 38DMG Throw - Sets up Wall combo if Unbroken
- i15 D4,2,1+2 - 38 DMG - #unsafe #launchPunishable #wallbreak - Demoman :)
- i19 CH SS3 > D1+2 - 50 DMG - #unsafe #wallbreak
- i22 QCB1 - 24 DMG - #chipDMG #forceCrouch #safeOB
| Whiff punishers | |||||
| Move | Speed | Range | Damage | Risk | Hitbox |
|---|---|---|---|---|---|
| CS.2 | i13~14 | 2.8 | 45 | -17 | Mid |
| f,F+2,1 | i15~17 | 3.03 | 34 | -12 | Mid |
| f,F+2:1 | i15~17 | 3.03 | 38 | -4 | Mid |
| SWA.2 | i15 | 2.75 | 27 | -9 | Mid |
| df+2 | i15~16 | 1.97 | 13 (69) | -8 | Mid |
| f,F+4 | i27~34 | 4.18 | 20 (72) | +2 | Mid |
| b,n,f+1 | i28~31 | 22 (59)[1] | -6 | High | |
Grabs
- i11 - B 1+4 - 40 DMG - 1 break
- i12 UF1+2 - 40 DMG - #floorbreak - 1+2 break
- i12 FF1+2 - 38 DMG - #wallbreak - 1+2 break
- i12 2+4 B hold - 40 DMG - 2 break
- i12 DF1+3 - 22 DMG - +9 trap setup - 1 break
- DF1+3 > QCF 2 - #wallbreak #uhhhhaa
- Takedown.2,d+1,1,1+2 -50 DMG - 1 break
- Takedown.1+2 - 25 DMG - 1+2 break
Frame Traps
Setup moves:
- i12 DF1+3 (throw +9/ -2 ob)
- i12 DF1,b (+3ob/+9oh)
- i15 SWA4 (+1ob)
- i22 UF2 (+5ob)
- i20 SS1 (+8ob)
Samples
Safe
- i15 SWA4 (+1 ob) > 1,2 (-3 ob) - 18 DMG
- i20 SS1 (+8 ob) > QCF 1(-4 ob, #launcher) -21 DMG
- i22 UF2 (+5 ob) > B3 (-9 ob, #launcher) - 19 DMG
Unsafe
- i15 SWA4 (+1 ob) >!i10 1,2,3(-25 ob) can be hit confirmed - 25 DMG
- i20 SS1 (+8 ob) > QCB1+2(-14 ob, #launcher)
Deep Dive Startup Delay/Input Lockout
There is a 10-frame window after Deep Dive where Paul's movement is locked and attack options (both WS and DPD) start up 1-10 frames slower.
-

iWS1 (normally i15~16) hits on frame 25 when input immediately after Deep Dive.
-
DPD.2 (normally i15) hits on frame 25 when input immediately after Deep Dive.


-
Paul cannot block in the 10-frame lockout window following a Deep Dive input.
-

Paul returns to a standing state and is able to block again at the end of this period.


An immediate press after DPD (WS1/WS2/WS3/WS4/DPD2/DPD4/DPD3+4) will add 10 frames of startup to that move. This delay decays gradually for each frame following the DPD input, until startup eventually returns to normal. For example:
- WS1 startup is i15~16
- d, df, d, df, WS1 startup is i25~26
- d, df, d, df, (4f delay), WS1 startup is i21~22
- d, df, d, df, (5f delay), WS1 startup is i20-21
And so on until 9f delay (10f after DPD), when WS1 startup is back to the regular i15~16.
The Frame Data display in Practice/Replay mode does not account for these additional frames and shows only the attack's normal startup.
Paul's only bufferable movement in this state is u, though this cannot be used to immediately crouch cancel (see next section for details).
Lockout frames begin as soon as the initial crouch dash is canceled into Deep Dive. Delay between CD and DPD inputs does not seem to matter.
This delay makes Deep Dive a more committal approach than Paul's regular crouch dash and has practical drawbacks in both neutral and pressure. Be mindful of this extra startup before attacking with a long-range iWS1,2 or DPD.2, and avoid using DPD inputs for iWS at closer ranges whenever possible.
Crouch Cancel Does Not Avoid Lockout
Crouch canceling to avoid the DPD delay window and immediately return to neutral does not seem possible. The sidestep from crouch cancel will not come out until 10 frames after DPD, and no other directional movement or attack can be executed or buffered in the interim.
This includes b, meaning you cannot block for at least 10 frames after DPD.
-
Mids cannot be blocked during the lockout window.
-
Highs will still be evaded.


Other
- Canceling ff+2,2 via db input gives access to easy crouch pressure mixups such as Ultimate Tackle (fc.d+1+2), and Thunder Palm (ws.2)
- ↑ qcf+1 minicombo follow up